Chapter 2 of 8. Prerequisite: a Google account that owns or has been granted access to at least one Search Console property and one GA4 property. If you have neither, you can still follow the chapter — the project setup is the same; you will just not have anything to query yet.
The project is the boundary
Every Google API call you make in this guide is going to route through a Google Cloud project. The project is the unit of quota, the unit of billing (if billing applies), the unit of API enablement, and the boundary against which an OAuth client is issued (per Google Cloud's project documentation).
For automation that hits the GSC and GA4 APIs, you want a single project that owns:
- A short, memorable project ID that you will type into commands.
- The two APIs enabled (Search Console + GA4 Data).
- One OAuth 2.0 client of type Desktop application.
- A consent screen configured to issue tokens for your own Google account.
You do not need billing enabled for this. The GSC API and the GA4 Data API are both available on the free tier at quotas that comfortably cover daily-digest automation. If you start running the API every minute against twenty properties, that changes — but you will know when that day arrives.
Naming the project — step by step
The project name (human-readable, mutable) and the project ID (machine-readable, immutable, must be globally unique across all of Google Cloud) are separate fields. Get the project ID right the first time because you cannot change it.
- 01
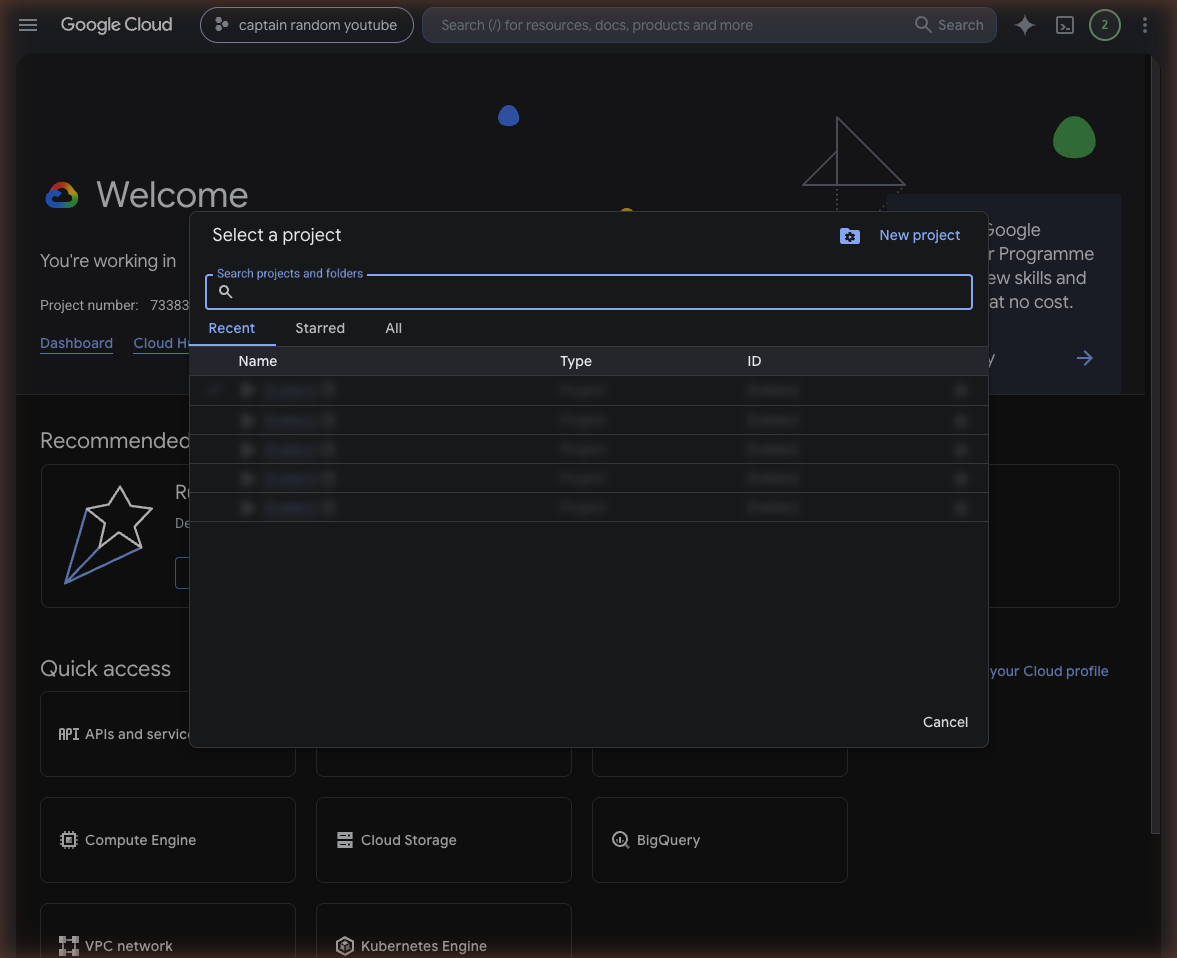
Open console.cloud.google.com signed in to the Google account that owns (or has been granted access to) the Search Console and GA4 properties you want to query. Click the project picker in the top bar.
- 02
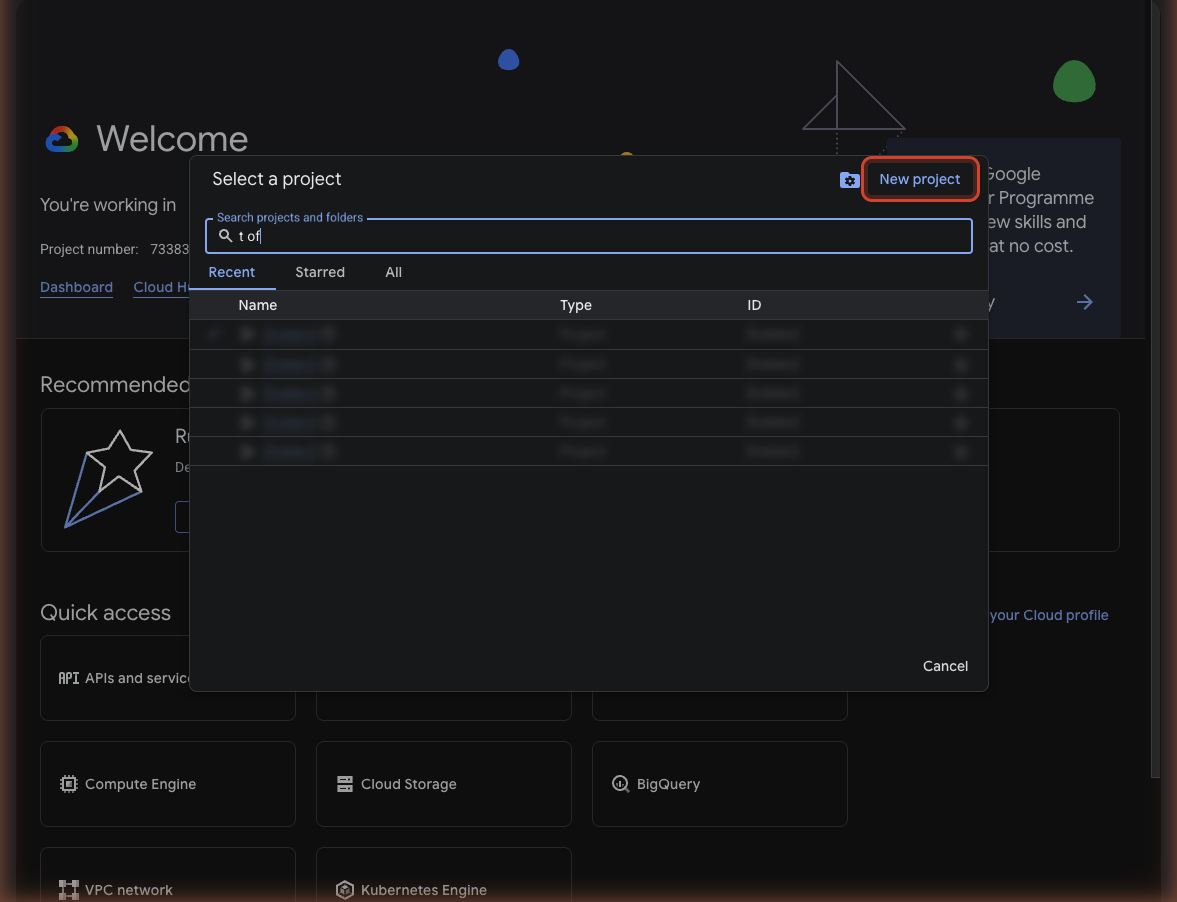
In the project picker dialog, click NEW PROJECT in the top-right.
- 03
Fill in the name. A pattern I have used and would recommend:
- Project name:
captain-random-telemetry— descriptive, includes the brand, makes sense in the dashboard. - Project ID: leave as the auto-suggested one if it is reasonable. The console suggests something like
captain-random-telemetry-461920. Globally unique, short enough, you will not have to remember the number because most CLI invocations let you pick the project by name.

- Project name:
What you want to avoid in the project ID:
- IDs that include the company name of a job you might leave (
acme-corp-...). If the project outlives the affiliation it becomes confusing. - IDs that include
prodordev(these are environment claims that may not match the project's actual role over time). - IDs that include a year (
...-2026). Same reason. The project will probably outlive the year.
Enabling the APIs — step by step
You will need two APIs enabled on the project, both via the API Library in the Google Cloud console:
- Google Search Console API — the one whose docs live at developers.google.com/webmaster-tools. Despite the older "webmaster-tools" path, it is the only GSC-data API Google publishes; there is no separate "GSC Indexing API" for what we are doing here. (The Indexing API is a different surface — it is for content owners to push job-posting and live-stream changes; it is not the one you want for telemetry.)
- Google Analytics Data API — the GA4 query surface, documented at developers.google.com/analytics. Note this is specifically the GA4 Data API, not the older Reporting API which served Universal Analytics and is now legacy.
- 04
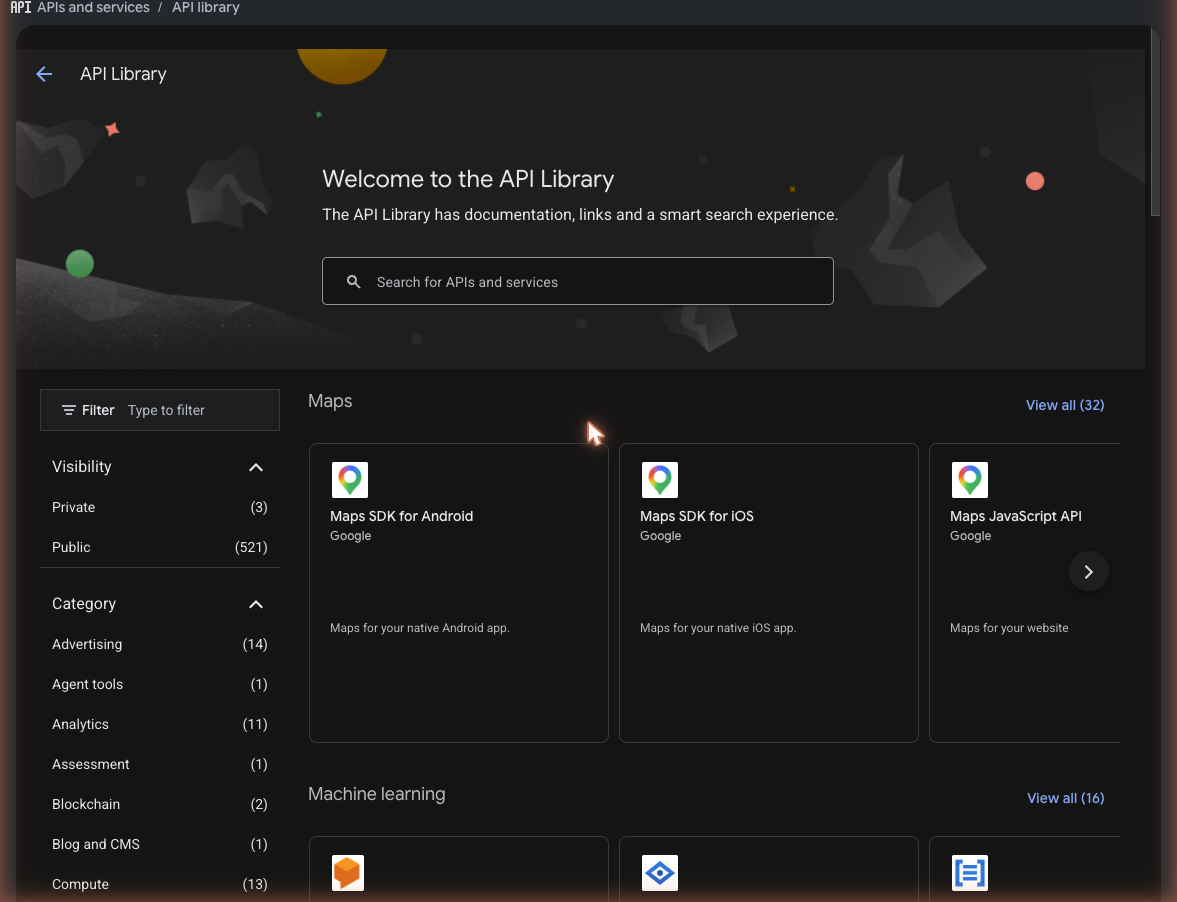
From the project dashboard, open the navigation menu (top-left burger), then APIs & Services → Library.
- 05
Search for
Search Console API. Click into the result and click ENABLE. Wait a few seconds — the page reloads and the button changes to MANAGE.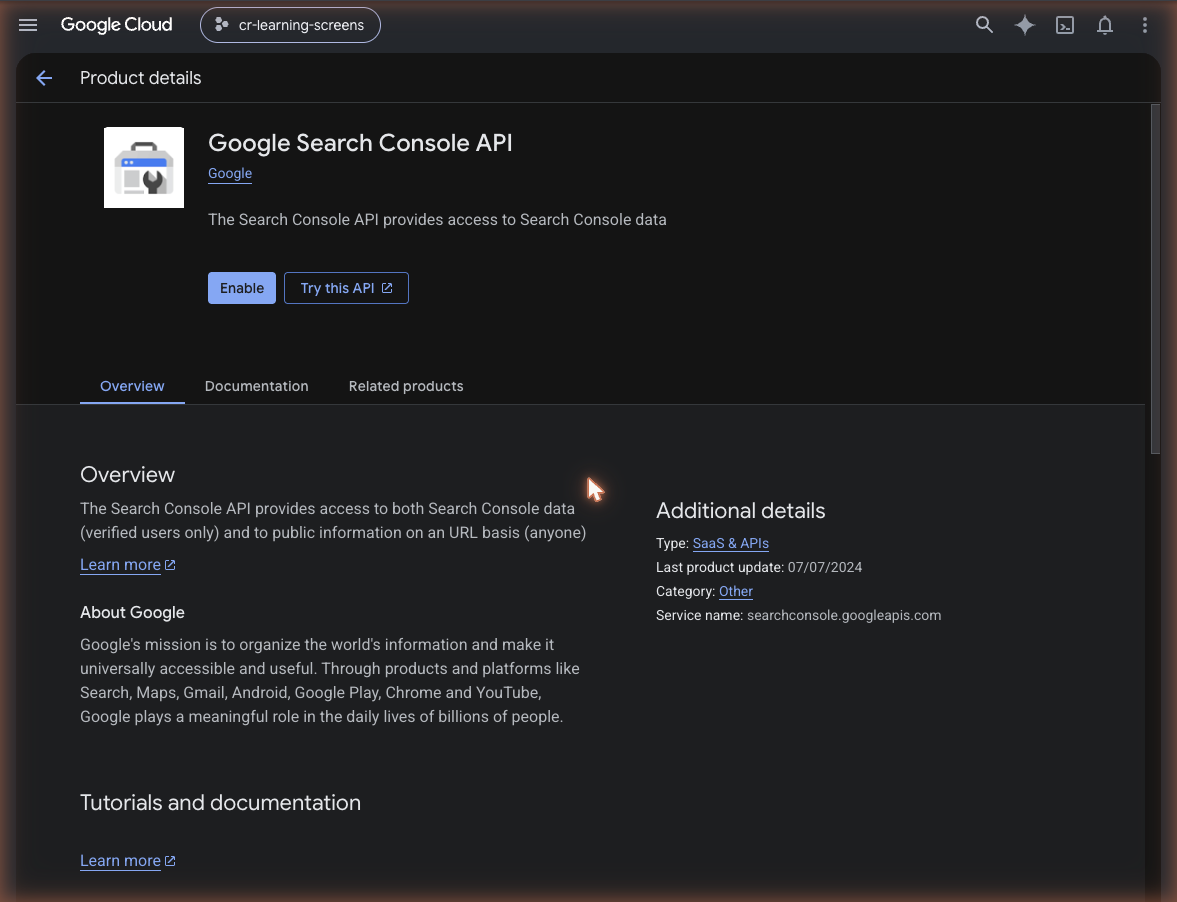
- 06
Back in the Library, search for
Google Analytics Data API— make sure you select the Data API result, not the Admin API (the Admin API is for managing the GA4 property itself; it is a separate surface). Click ENABLE.
Enabling each API is a single click. The result is a record on the project saying this project is permitted to call this API. Quota counts against the project; quota errors mention the project ID.
Configuring the OAuth consent screen — step by step
Before you can issue an OAuth client, you need to configure the consent screen — the page Google shows when an application asks for permission against an account. Google reorganised this in 2026 into a four-step wizard under Google Auth Platform (still reachable from APIs & Services → OAuth consent screen). The semantic content is the same as the old flow; the labels and grouping moved.
- 07
From the navigation menu, go to APIs & Services → OAuth consent screen. The Google Auth Platform wizard opens at the App Information step (step 1 of 4). Fill in the App name (anything descriptive —
Captain Random Telemetryworks) and pick your User support email from the dropdown. Click Next.
- 08
In the Audience step (step 2 of 4), choose External. This sounds wrong (you are the only user) but Internal is restricted to Google Workspace organisations and personal Gmail accounts cannot select it. The description explains that the app will start in testing mode and only test users you add will be able to grant consent — accept that, it is the right state for personal automation. Click Next.

- 09
In the Contact Information step (step 3 of 4), add your own email under Email addresses. The previous incarnation of the wizard had a separate Scopes step which is gone — scopes are declared in code at runtime per Google's OAuth 2.0 web-server flow documentation, not at project-time. Click Next.

- 10
In the Finish step (step 4 of 4), tick I agree to the Google API services user data policy → click Continue. Then click Create at the bottom of the wizard. The wizard finalises and you land on the Overview page of the new Google Auth Platform for your project. Test users are configured after the wizard, via the Audience section in the left sidebar — open Audience, scroll to the Test users section, click Add users, and add your own Google account email. While the app is in Testing mode, only listed test users can grant consent.
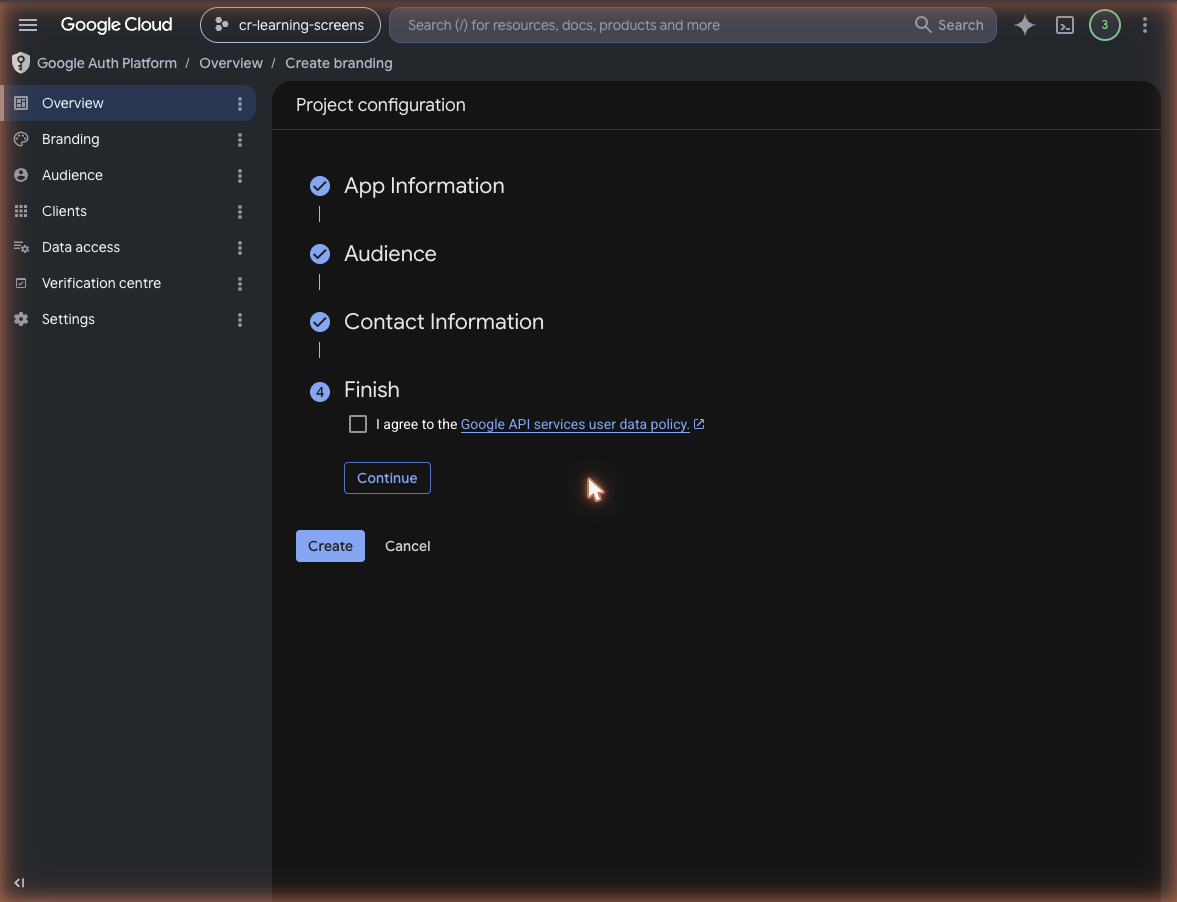
The consent screen will stay in Testing mode permanently. You will see periodic warnings that the app is unverified. Ignore them; the warnings are for end users on a public app. For an automation that only your account ever grants consent to, Testing is the appropriate state.
Creating the OAuth client — step by step
With the consent screen configured, create the OAuth client. In the redesigned Google Auth Platform the Credentials page was renamed Clients in the left sidebar — it does the same job.
- 11
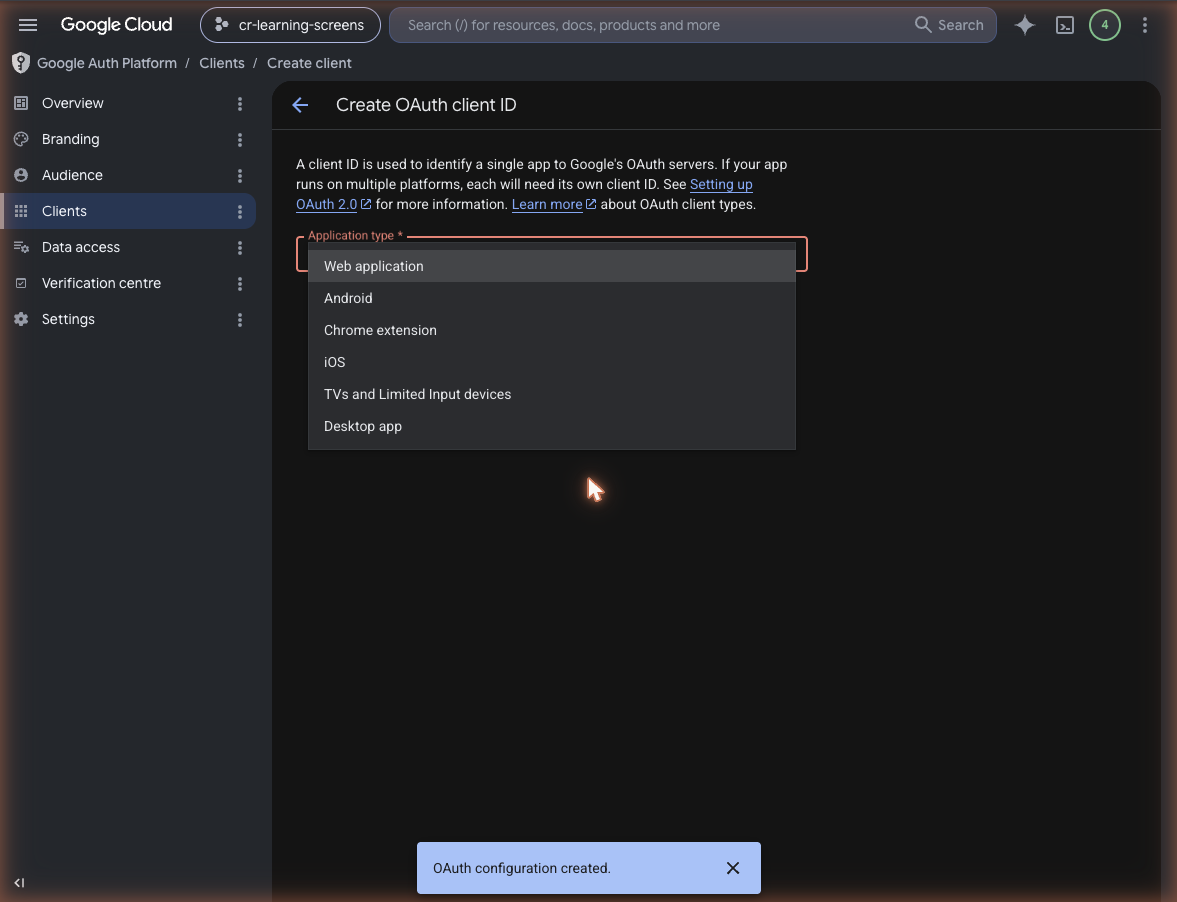
In the left sidebar of the Google Auth Platform, click Clients, then + Create client at the top. The Create OAuth client ID form opens with an Application type dropdown. Open the dropdown — you'll see Web application, Android, Chrome extension, iOS, TVs and Limited Input devices, and Desktop app.
- 12
Pick Desktop app (sometimes labelled Installed application depending on which version of the console you are looking at). Give it a Name —
Captain Random Telemetry — desktopworks. The name is only shown to you in the console, not to end users. Click Create.
- 13
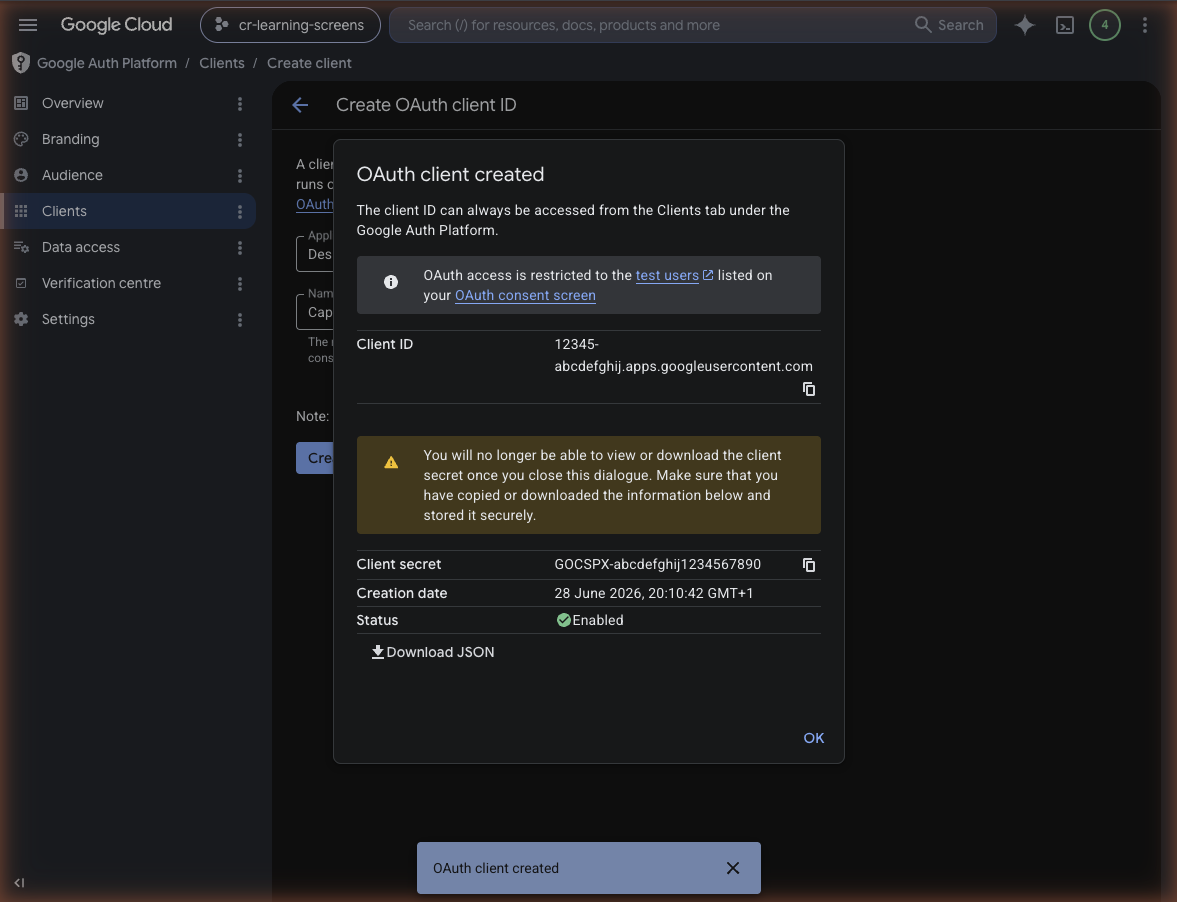
You will get two values back. Copy them both — the dialog also offers a JSON download which is fine to keep alongside. The dialog warns you that the client secret cannot be viewed or downloaded again after you close it; that's correct, take it seriously.
- Client ID — typically ends in
.apps.googleusercontent.com. Identifies the application to Google. - Client secret — a short alphanumeric string. Authenticates the application back to Google during the OAuth exchange.
- Client ID — typically ends in
Neither of these is a user credential. They identify the application, not the user. The user credential (refresh token) comes later, after the first time you run the consent flow against an actual account. Chapter 3 walks through what happens during that consent flow and chapter 4 covers what to do with the refresh token afterwards.
What to do with the credentials right now
You have two strings (client ID + client secret) and nothing to use them with yet. The right place to put them is a .env file at the root of the project you are about to build:
# .env  (add to .gitignore before committing anything)
GOOGLE_OAUTH_CLIENT_ID=12345-abcdefghij.apps.googleusercontent.com
GOOGLE_OAUTH_CLIENT_SECRET=GOCSPX-abcdefghij1234567890
Make sure .env is in .gitignore before you save the file. The classic foot-gun is committing the .env, noticing seconds later, deleting it in a second commit, and forgetting that the first commit is still in the history. The fix is annoying enough that the avoidance is worth the half-second pause to check .gitignore first.
What's next
Chapter 3 walks through what actually happens during the OAuth 2.0 consent flow — what each role does, what each token is for, why there is both an access token and a refresh token, and why the consent step happens exactly once per scope-set per user. Chapter 4 covers where the refresh token goes after consent (and why it does not belong in .env).
If you would rather skip the protocol theory and jump straight to the storage layer, Chapter 4 reads cleanly on its own; the relevant context from chapter 3 is condensed into Chapter 4's intro.
Stand up your own telemetry project
Create the Google Cloud project that will own every API call for the rest of this guide. Name it to outlive employers, environments and years, enable exactly the two APIs the automation needs, configure the consent screen in Testing mode, and issue a Desktop app OAuth client whose credentials land in a gitignored .env file.
Expected behaviour
- A project whose ID contains no employer name, no prod or dev claim, and no year
- Search Console API and Google Analytics Data API both showing MANAGE in the API Library, with the Admin API left untouched
- A consent screen in Testing mode with your own account added as a test user via the Audience section
- A Desktop app OAuth client whose client ID and client secret are stored in a .env file
- git check-ignore confirms .env is ignored before any commit could have included it
PROVE IT Show the enabled-APIs list for your project, then run git check-ignore -v .env in the repo to demonstrate the ignore rule was in place before the file ever reached a commit.
You want to query GA4 data from your scripts. Which API do you enable on the project?
Which application type do you choose when creating the OAuth client?
You commit your .env by accident, delete it in the very next commit, and push. Why is that not enough, and what does the chapter say to do instead?
Show answer
Deleting the file in a second commit leaves the first commit, and the secret inside it, in the repository history. The chapter's answer is prevention: confirm .env is listed in .gitignore before you save credentials into it, because scrubbing history after the fact is annoying enough that the half-second check is worth it every time.
↺ re-read: “What to do with the credentials right now”